


- 홈
- 보드
- 아두이노
- 보드
[] [Arduino MKR Motor Carrier] 정품 아두이노 MKR 모터 캐리어 (해외배송 가능상품)


[Arduino MKR Motor Carrier] 정품 아두이노 MKR 모터 캐리어 (해외배송 가능상품)
| 제조사 | Arduino |
|---|---|
| 브랜드 | Arduino |
| 판매가 | 107,200원 |
| 적립금 | 1,070원 |
| 자체상품코드 | P-T160 |
| 국내·해외배송 | 국내배송 |
| 배송방법 | 택배 |
| 수량 |   |
COMMENT |

 |
(최소주문수량 1개 이상 / 최대주문수량 0개 이하)
사이즈 가이드 수량을 선택해주세요.
위 옵션선택 박스를 선택하시면 아래에 상품이 추가됩니다.
| 상품명 | 상품수 | 가격 |
|---|---|---|
| [Arduino MKR Motor Carrier] 정품 아두이노 MKR 모터 캐리어 |


|
107200 ( 1070) 1070)
|
|
TOTAL PRICE(수량) : 0 (0개)
|
||
이벤트
상품상세정보
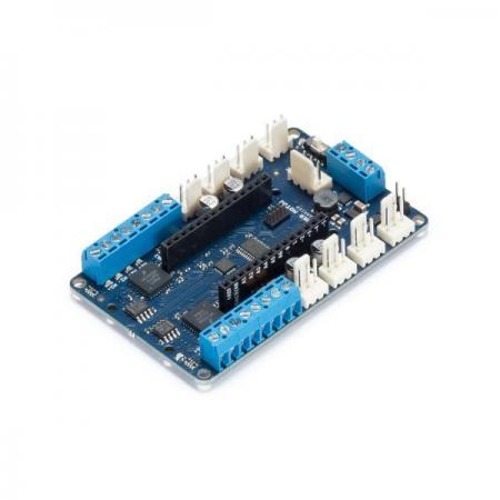
Arduino MKR Motor Carrier
OVERVIEW
The MKR Motor Carrier is an MKR add-on board designed to control servo, DC, and stepper motors. The Carrier can also be used to connect other actuators and sensors via a series of 3-pin male headers.
The summary of features is shown below:
- Compatible with all the boards in the MKR family
- Four servo motor outputs
- Four DC motor outputs (two high performance + two standard performance)
- Sensing of current feedback for the high-performance motors
- Two inputs for encoder sensors
- Four inputs for analog sensors (3-pin compatible)
- Possibility to read the status of the batteries
- ON-OFF switch with Power ON LED
- LiPo battery connector (2S or 3S compatible) and power terminal block for alternative power source
- LEDs to visually indicate the direction of the rotation of the DC motors
- On-board processor for automated control of some of the outputs
- I2C connector as a 4-pin male header
TECH SPECS
|
Microcontroller |
ATSAMD11 ( Arm Cortex-M0+ processor) |
|
Max current (MC33926) |
5 Amps Peak, RMS current depending on the degree of heat sink provided |
|
Max current (DRV8871) |
3 Amps peak, current limited by current sense resistor. |
|
Rated voltage |
6.5 to 11.1V |
|
Reverse current protection |
Yes |
|
Over Temperature shutdown protection (for DC motor drivers) |
Yes |
|
Clock speed |
48 Mhz |
|
On board voltage regulator |
5V |
|
Interface |
Terminal block and 3 pin/4 pin header connector |
|
Compatibility |
MKR Family |
The MKR Motor Carrier features two MC33926 motor drivers for high-performance DC motor control with direct connection to the MKR1000, current feedback, and capacity for up to 5 Amps (peak). In addition, there are two DRV8871 drivers that are controlled from a SAMD11 microcontroller that communicates with the MKR1000 via I2C (SPI optional). The SAMD11 is also used to control the servos, read the encoders, and read the battery voltage. There is an interrupt line connecting the SAMD11 (on PA27) and the MKR board.
Note that for extended use or high-current motors, an extra heatsink (and eventually a fan) might be required for the drivers.
When plugging the MKR1000 and the Motor Carrier, some of the pins will stop being available for you to use in your code, as they will be needed to control some of the features of the Carrier. For example, the current feedback from the two MC33926 drivers is connected directly to some of the analog pins on the MKR1000. The following list explains which pins of the MKR1000 are used to control the Carrier:
- Analog pin A3 for current feedback from Motor3
- Analog pin A4 for current feedback from Motor4
- Digital pin D2 for IN2 signal for Motor3
- Digital pin D3 for IN1 signal for Motor3
- Digital pin D4 for IN2 signal for Motor4
- Digital pin D5 for IN1 signal for Motor4
- Digital pin D6 for Interrupt signal from the SAMD11 to the MKR1000
- Digital pin D11 for the SDA signal (I2C)
- Digital pin D12 for the SCL signal (I2C)
Also, some pins can optionally be connected via a soldering jumper or a 0 Ohm resistor. These pins are:
- Digital pin D1 for the SF signal from the MC33926 drivers (optional)
- Digital pin D7 for the SPI SS signal (optional)
- Digital pin D8 for the SPI MOSI signal (optional)
- Digital pin D9 for the SPI SCK signal (optional)
- Digital pin D10 for the SPI MISO signal (optional)
To use the Carrier, you will need to plug an MKR board (the MKR1000, MKR Zero, or other) on the headers at the center of the board. Make sure the MKR board is connected in the proper direction. You can do this by making sure the info printed on the side of the headers are matching for both the MKR board and the Motor Carrier. Once the board is properly connected to the Motor Carrier, you can start programming the board. To control the motors, you will need to import the MKR Motor Carrier library. You can find more information about the library here. If you want to read more about how to install a library then you follow this link. When working with motors, you will need an external source to feed the motor drivers and power up the motors. You can do this by connecting a LiPo Battery to the battery connector or using an external power source and connecting it to the VIN input on the terminal block. It is recommended to do these operations with the power switch at the OFF position. Once the external power is connected to the board, the power switch can be turned on.
Libraries
DOCUMENTATION
OSH: Schematics The Arduino MKR Motor carrier is open-source hardware! You can build your own board using the following files:
★보드 뒷면에 납땜쇼트 발생된 부분에 대하여
회로에 연결되는 부분은 아니라 사용에 문제가 없는 것으로 확인되었습니다.
(아두이노 뿐만아니라 다른 매입처도 동일한 것으로 확인 됨)
이로 인하여 교환 및 반품 어려운 점 구매에 참고 부탁드립니다.
상품결제정보
고액결제의 경우 안전을 위해 카드사에서 확인전화를 드릴 수도 있습니다. 확인과정에서 도난 카드의 사용이나 타인 명의의 주문등 정상적인 주문이 아니라고 판단될 경우 임의로 주문을 보류 또는 취소할 수 있습니다.무통장 입금은 상품 구매 대금은 PC뱅킹, 인터넷뱅킹, 텔레뱅킹 혹은 가까운 은행에서 직접 입금하시면 됩니다.
주문시 입력한 입금자명과 실제입금자의 성명이 반드시 일치하여야 하며, 7일 이내로 입금을 하셔야 하며 입금되지 않은 주문은 자동취소 됩니다.
배송정보
- 배송 방법 : 택배
- 배송 지역 : 전국지역
- 배송 비용 : 3,000원
- 배송 기간 : 1일 ~ 2일
- 배송 안내 : - 제주도, 산간벽지나 도서지방은 별도의 추가금액을 지불하셔야 하는 경우가 있습니다.
고객님께서 주문하신 상품은 입금 확인후 배송해 드립니다. 다만, 상품종류에 따라서 상품의 배송이 다소 지연될 수 있습니다.
교환 및 반품정보
교환 및 반품이 가능한 경우- 상품을 공급 받으신 날로부터 7일이내 단, 가전제품의
경우 포장을 개봉하였거나 포장이 훼손되어 상품가치가 상실된 경우에는 교환/반품이 불가능합니다.
- 공급받으신 상품 및 용역의 내용이 표시.광고 내용과
다르거나 다르게 이행된 경우에는 공급받은 날로부터 3월이내, 그사실을 알게 된 날로부터 30일이내
교환 및 반품이 불가능한 경우
- 고객님의 책임 있는 사유로 상품등이 멸실 또는 훼손된 경우. 단, 상품의 내용을 확인하기 위하여
포장 등을 훼손한 경우는 제외
- 포장을 개봉하였거나 포장이 훼손되어 상품가치가 상실된 경우
(예 : 가전제품, 식품, 음반 등, 단 액정화면이 부착된 노트북, LCD모니터, 디지털 카메라 등의 불량화소에
따른 반품/교환은 제조사 기준에 따릅니다.)
- 고객님의 사용 또는 일부 소비에 의하여 상품의 가치가 현저히 감소한 경우 단, 화장품등의 경우 시용제품을
제공한 경우에 한 합니다.
- 시간의 경과에 의하여 재판매가 곤란할 정도로 상품등의 가치가 현저히 감소한 경우
- 복제가 가능한 상품등의 포장을 훼손한 경우
(자세한 내용은 고객만족센터 1:1 E-MAIL상담을 이용해 주시기 바랍니다.)
※ 고객님의 마음이 바뀌어 교환, 반품을 하실 경우 상품반송 비용은 고객님께서 부담하셔야 합니다.
(색상 교환, 사이즈 교환 등 포함)


 {$autoComplete_query_view}
 {$recentQuery_query}


